mandag den 16. november 2015

Alfa Romeo 164 S Anti Roll Bar front

Anti Roll Bar og swaybar comes in several diameters , before ordering parts , measure the diameter.
This is a standard 18 mm.
164.1

Inspect the bushings and order your parts.
164.2


This is a good way to start , the droplinks easy access and a easy fix.They are the same depite different options in ARB diameter

Be aware of this bush it doesnt come with the standard Powerflex kit.          164.3


socket or ringspanner 17 mm    
Torque 27 - 34 Nm.    164.4

Gentle tap with the hammer at the head of the droplink  leave it on until the other end is of
                                                                           164.5


15 mm under the suspension arm
 Torque 16 - 20 Nm.
                                                                      164.6

Press the suspension arm down , A crowbar may come in handy.
Or undo the other side and the ARB end can be  turned up.
164.7

Inspect the old wasted part and know , 
buying a replacement part is almost always wort it 164.8


Thats how bad the old one is , threads gone.
New bolts M10 X 1,25 with nylonlock ring 
164.9
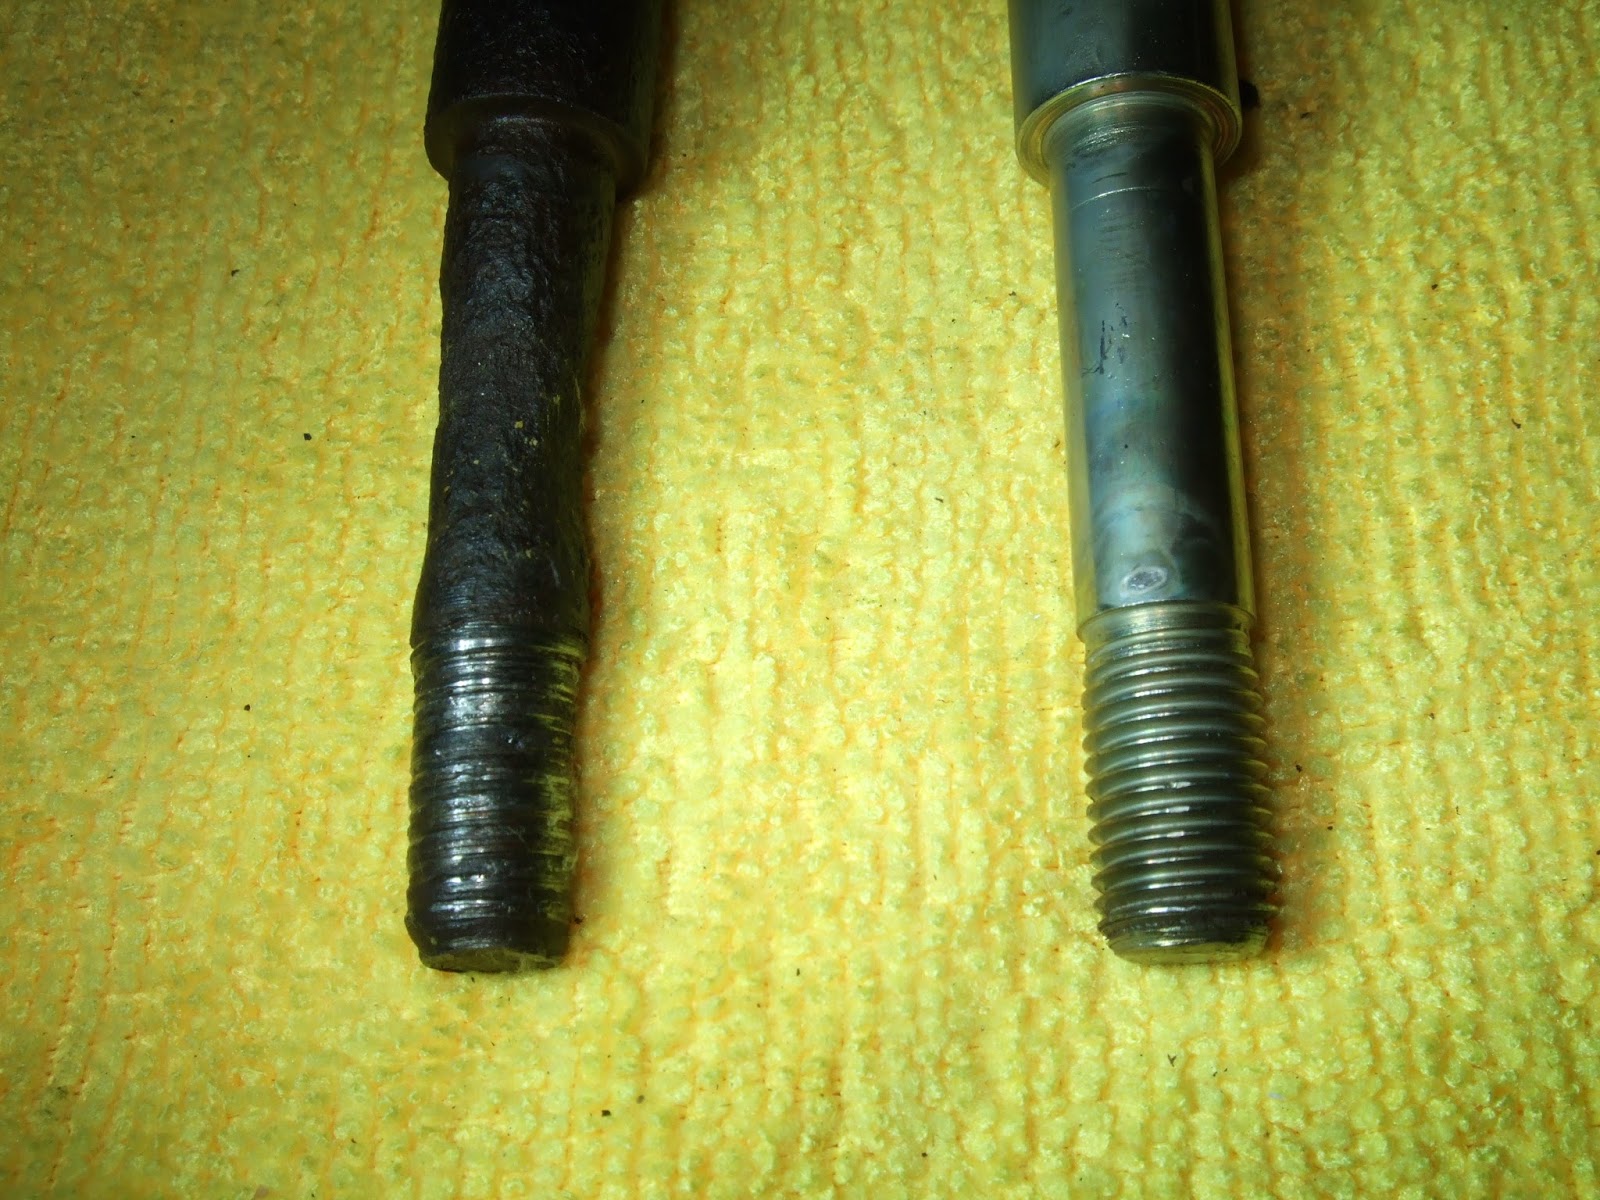

M 10 X 1,25                           164.10


Old polybushes , well they are done too.
164.11


These  Ø 10,5 mm inside diameter                                         164.12


Ø 30 mm outside diameter                                                                                                        164.13


Thickness about 1,5 mm                                                                                      164.14

Just think I prefer these bushings , arrow pointing at where droplink passes through lower suspension arm 164.15


 It stands to reason that this standard rubber bush will be the weak spot to all the stress to the ARB                                                     
Compare these powerflex they do not have the elevated central part
164.16


 Remove the old OEM bush
Havent got a press , try a drillbit in the rubber and it will come out                                164.17

Clean grease


Clean grease squeese. silicon grease please for polyurethane bushings

164.18


164.19
 Grease

Squeeeeeese Bush first
Make absolutely shure alignment is perfect , if not two things might happen
1 The items come at you at deadly speed
2 At least one item is ruined                                                                                             164.20

Steeltube second                                                                                                                       164.21


Nice end result.                         164.22


164.23 ready.


From the right side of the same car I told you so.
                                                                                                                                                     164.24


You dont want this, its an accident just waiting to happen.
                                                                                                                                                 164.25

I think we got that now 
                                                                                                                                                     164.26


You might consider the fact that SAAB 9000 has the same droplinks at the front , Try E bay its faster than getting the Original from Italy.
 Shipping from Italy is usally 14 - 20 $ for the pair.

Refitting Silicone grease and you are good to go.


ARB polybushings these comes preslit so you can change to theese with the ARB on the subframe.
                                                                                                                                                   164.27

Yes its tight , open end ringspanner might or might not do the job , If you plan to reuse  the bracket and bolts , a ruined nut is not funny THEESE ARE WELDED ON
                                                                                                                                                        164.28


Get these Di Fatta Bros 15 $ each , bracket only                                                                                                                                                                                                                                           164.29

Well these bracket bolt are kind of welded into place , damned this one is broken and the bolt at the rear  is broken. Time to cut Dremel or what you have.

13 mm ringspanner will give you enough akcess for the front bolt , not the rear. You might have luck using a very long socket extension 1/4 " , I didnt.
Take inner wing plasticlining of , that involves 25 years old screws and brackets for theese , a Dremel with a cutting disck might save the day ....again.                          Right side of car                   164.30

That bolt for the little cover that protects brakeline connection, ABS sensor line ,brakepad wear sensor line and the shockabsorner line , this is a S model.
SO BE VERY VERY CAREFUL.
                                                                                                                                                      164.31

ABS connection is stuck behind the AC hose on the inner wing , just anoter rusty bolt to remowe.


 With the rear inner lining off and this tool you just might be lucky and get the rear bolt of     164.32

Old rusty

Sicily


Gently turn and pull from left side of car , there is more room there due to lack of brake lines , you do not have to remove the bush yet , but the bracket is ok to remove giving you more wiggiling room.
                                                                                      164.33

clean rust remove grease anti rust , prime topcoat.Check your new brackets           164.34


Is it the same distance between bolt holes                                                                            .164.36


ARB cleaned , rust removedanti rust something ,primer and topcoat on                            164.37


Stering rack is next.

164.38


I'll be back.

William Lutken


fredag den 23. oktober 2015

Alfa Romeo 164 S 3,0 V 6 brakes rear

Brakes on the rear accounts for 20 - 30 % of brakepower. However 20 % might be important and you dont want the rear end blocking.
Handbrakecable is a weak spot the dustboots do not last very long water and rust will eventually seize it.
Once again simple maintenance can save you a lot of trouble a lot of money and keep you out of harms way.


RED RUBBER GREASE UNDER ANY DUST BOOT ,CALIPER DUST BOOTS AND INCLUDING YOUR HANDBRAKECABLE.

                                                                                         Enough for a lifetime     164.1

This for any contact site between brake pads and caliper and caliper bracket
                                                                                                                               164.2

Things that has to stay on the car like the brake caliper securing bolts 164.3

Handbreak cable near caliper dust boots.You should always have a handbrakecable on your sparepart shelf.

Screwdrivertip pointing at the weak spot. 164.4

Be gentle with the grease at you rear end.
Screwdrivertip pointing at the weak spot.

APPLY GREASE PLEASE                                                                                   164.5

Handbrake handle dertail of adJusting mechanism.

164.6


Rearbrake caliper bracket .Sliding pins and their rubber dust boots
GREASE THEM TOO 
                                                                                                                                                      164.6


Finally , two rear Bembo Max ready for the install.
164.7


Way to many internal parts for a complete take down is funny 
164.8


Ill be back.
William Lutken

onsdag den 23. september 2015

Alfa Romeo front suspension

Another problem.
Boots not really in good shape
and I think a bump stop is missing too.

Boots are supposed to prevent dust to enter
the tight space between the shiny rod
and the rubber seal in the shock absorber.


164.0 Note the location of spring end.
 Top and bottom


Parts bump stops there are some for Koni as well,
 even polyeurethane ones 


164.1    Sachs repair kit                                                          Shock core diameter 22 mm
                                                                                     164.2


Tools well there are many out there you need a good tool , these springs when compressed act ekcately like the springs in the pens you used to take apart in school on boring days , compress them and they might fly a considerabely distance...remember how easy they were to compress , their weight and the distance the flev.

164.3


You are going to need some really sturdy stuff this is the best I have ever had
164.4


For the top of the strut you need another tool a very loooong socket 22 mm open alloving you to stop the shiny rod to rotate this one sadly didnt work its way to big in outer diameter
164.5 top mount three bolts 13 mm                                                164.6 the not so right socket 

164,7 So if you are out there to buy tools max outer dia. would be : 33 mm
Top mount upside down inner diameter of  hole for shock nut shown


Damned Pain Arrrrrrgh.
164.8
 This one fits perfectly sadly it comes without the opening that allows you tho fix the shockrod from spinning hence plan B a mole grip at the highest akcessible point on the rod.

Top mount out of car to clearer illustrate
                                                                        Torque 66 - 82 Nm.                               164.9

Start at the top Top mount 13 mm ringspanner or long socket .
Torque 12 - 18 Nm.                                    164.10


Now the base of the strut is the original Boge , the Koni is insertet into that and fixed to it with a bolt at the bottom.
To loosen the bracket you once again need a breaker bar and a 17 mm  socket. WD 40 might come in handy too.....

Torque 40 - 49 Nm.                       164.11
 Thes came of surpricingly easy , now remove the top mount before you remove these bolts completely or you will find it difficult to support the weight of the strut AND loosen the three nuts.

164.12 leave them the strut assembly is heavy.
pull them out when your foot is out of the way.
Secure the strut in a wise bottom bracket facing right or left or whatever you prefer , there are many many asymmetrical parts and you need to realign them.

164.13

Be careful you might lose a hand or two. Church in Verona Italy


Put your spring compression tool on and squeeeeeeese.MAKE SHURE SEVERAL TIMES THAT THE HOOKS SPADES OR WHATEVER IS IN CONTACT WITH THE SPRING IS IN THE RIGHT PLACE . Here shown with the molegrip at the top of the shock rod.

 Contactpoints at the spring                                                                                                                                                                                                                           Compressing tool and molegrip
                                                                                                                                                        164.14


Remove parts top to bottum here closeup of the molegrip position on the shockabsorber core, it really doesent leave any marks.

164.15

note the two screwdrivers pointing at the groove and the corresponding thing
 at the green screwdriver.
Bump stop ready to be shortend

164.17

164.16

 Last part lover yellow bearing to the very left.


Whats left in the wise.            A compressible rod.Some force is needed !!

164.18                                                                                                                          164.19


That upon release returns 
164.20


Boot and bump stop , Spring has lowered the car a lot so the bump stop needs shortening.
Box knife lubricated with silicone spray does the job.
164.21                                                                                           164.22


Assemble boot and stop.
from below 
groove and notch
 apply silicon spray
164.23


 Bearing on

Boot and stop on silicon spray eases it a lot.

Grease between rod and rubber seal
silicone based grease
                                                            164.24                                                                          164.25


And then on the lower bearing.
Remember orientation
Screwdriver tip at the recess for the start of the spring strut body still in same orientation as during disassembly.
164.26                                                                              close up botttom plate and spring 164.27


align the upper plate and the top mount , the impression from the spring in the seal is clearly on the underside , this alignmentspot too.

164.28                                                     164.29


Well since plan A was the proper strut socket and it didnt fit Mole grip again in position above the bump stop , you have to depress the boot and the bump stop.

molegrip on shock rod top 164.30

Im waiting for a new driveshaft hence the delay in putting it back on the car . Torque for the top mount 13 mm nuts : Lower Bracket bolts  :


Well you could end up needing a pair of theese
                                                                                                                               164.31

Front trailing arm , front bush,despite the use of powerflex it doesent look right , we need to give it a closer look its powersteering oil all ower the place .
Torque 29 - 32 Nm.
                                                                                                                                                     164.32

You might as well be prepared for a lot of time , pain and suffering again under you car
                                                                                                                                                      164.33

Trailing arms usally comes with the two inner OEM rubber bushes preinstalled , some even with the outer ball joint.
Here hub assembly and brakes onto the outer ball joint.
                                                                                                                                                     164.34


Do you really want polyeurethane bushes , well at least the rear bush is reasonable easy to replace. Start your drillbit your stanley knife ad your Dremel                                                        164.35

Clean the aluminum casing , this is NOT clean    164.36


Final touch grinding paper onto the dremel and you end up with this GREEESE      164.37
SQUEECE
Do not panic if the bush tilts on it way through the aluminum casing,just continue   164.38

The aluminum casing jumps up like this 
164.39


Continue ,steel tube in GREEESE 164.40


This powerflex is asymmetrical
FRONT                                                                      164.41                                                       REAR


164.42
FRONT                                                                                                                                     REAR


164.43
Its time for some cake


 I´ll be back.
William Lutken